|
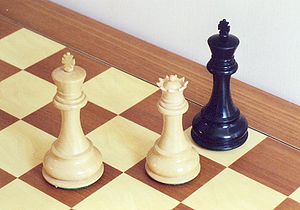
Checkmate Checkmate (often shortened to mate) is any game position in chess and other chess-like games in which a player's king is in check (threatened with capture) and there is no possible escape. Checkmating the opponent wins the game. In chess, the king is never actually captured. The player loses as soon as the player's king is checkmated. In formal games, it is usually considered good etiquette to resign an inevitably lost game before being checkmated.[1][2] If a player is not in check but has no legal moves, then it is stalemate, and the game immediately ends in a draw. A checkmating move is recorded in algebraic notation using the hash symbol "#", for example: 34.Qg3#. ExamplesA checkmate may occur in as few as two moves on one side with all of the pieces still on the board (as in fool's mate, in the opening phase of the game), in a middlegame position (as in the 1956 game called the Game of the Century between Donald Byrne and Bobby Fischer),[3] or after many moves with as few as three pieces in an endgame position.
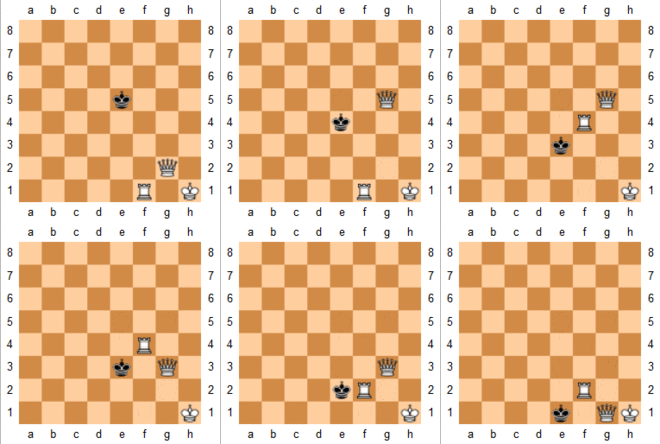
EtymologyThe term checkmate is, according to the Barnhart Etymological Dictionary, an alteration of the Persian phrase "shāh māt" (شاه مات) which means "the King is helpless".[7] Persian "māt" applies to the king but in Sanskrit "māta", also pronounced "māt", applied to his kingdom "traversed, measured across, and meted out" thoroughly by his opponent; "māta" is the past participle of "mā" verbal root.[8] Others maintain that it means "the King is dead", as chess reached Europe via the Arab world, and Arabic māta (مَاتَ) means "died" or "is dead".[9][10] Moghadam traced the etymology of the word mate. It comes from a Persian verb mandan (ماندن), meaning "to remain", which is cognate with the Latin word maneō and the Greek menō (μένω, which means "I remain"). It means "remained" in the sense of "abandoned" and the formal translation is "surprised", in the military sense of "ambushed".[11] "Shāh" (شاه) is the Persian word for the monarch. Players would announce "Shāh" when the king was in check. "Māt" (مات) is a Persian adjective for "at a loss", "helpless", or "defeated". So the king is in mate when he is ambushed, at a loss, helpless, defeated, or abandoned to his fate.[12] In modern Persian, the word mate depicts a person who is frozen, open-mouthed, staring, confused and unresponsive. The words "stupefied" or "stunned" bear close correlation. So a possible alternative would be to interpret mate as "unable to respond". A king being in mate (shah-mat) then means a king is unable to respond, which would correspond to there being no response that a player's king can make to the opponent's final move. This interpretation is much closer to the original intent of the game being not to kill a king but to leave him with no viable response other than surrender, which better matches the origin story detailed in the Shahnameh. In modern parlance, the term checkmate is a metaphor for an irrefutable and strategic victory.[13] HistoryIn early Sanskrit chess (c. 500–700), the king could be captured and this ended the game. The Persians (c. 700–800) introduced the idea of warning that the king was under attack (announcing check in modern terminology). This was done to avoid the early and accidental end of a game. Later, the Persians added the additional rule that a king could not be moved into check or left in check. As a result, the king could not be captured,[14] and checkmate was the only decisive way of ending a game.[15] Before about 1600, the game could also be won by capturing all of the opponent's pieces, leaving just a bare king. This style of play is now called annihilation or robado.[16] In Medieval times, players began to consider it nobler to win by checkmate, so annihilation became a half-win for a while, until it was abandoned.[15] Two major piecesTwo major pieces (queens or rooks) can easily force checkmate on the edge of the board using a technique known as the ladder checkmate.[17] The process is to put the two pieces on adjacent ranks or files and force the king to the side of the board by using one piece to check the king and the other to cut it off from going up the board.[18] In the illustration, White checkmates by forcing the Black king to the edge, one row at a time. The ladder checkmate can be used to checkmate with two rooks, two queens, or a rook and a queen.[18]  Basic checkmatesThere are four fundamental checkmates when one side has only their king and the other side has only the minimum material needed to force checkmate, i.e. (1) one queen, (2) one rook, (3) two bishops on opposite-colored squares, or (4) a bishop and a knight. The king must help in accomplishing all of these checkmates.[20] If the winning side has more material, checkmates are easier. The checkmate with the queen is the most common, and easiest to achieve. It often occurs after a pawn has queened. A checkmate with the rook is also common, but a checkmate with two bishops or with a bishop and knight occurs infrequently. The two-bishop checkmate is fairly easy to accomplish, but the bishop and knight checkmate is difficult and requires precision. King and queenThe first two diagrams show representatives of the basic checkmate positions with a queen, which can occur on any edge of the board. Naturally, the exact position can vary from the diagram. In the first of the checkmate positions, the queen is directly in front of the opposing king and the white king is protecting its queen. In the second checkmate position, the kings are in opposition and the queen mates on the rank (or file) of the king.
White checkmates easily.
With the side with the queen to move, checkmate can be forced in at most ten moves from any starting position, with optimal play by both sides, but usually fewer moves are required.[23][24] In positions in which a pawn has just promoted to a queen, at most nine moves are required.[25] In the position diagrammed, White checkmates easily by confining the black king to a rectangle and shrinking the rectangle to force the king to the edge of the board:
Avoid stalemate The winning side must be careful to not stalemate the opposing king, whereas the defender would like to get into such a position. There are five general types of stalemate positions that can occur, which the stronger side must avoid. The first two are more common.[27]
King and rook
The first diagram shows the basic checkmate position with a rook, which can occur on any edge of the board. The black king can be on any square on the edge of the board, the white king is in opposition to it, and the rook can check from any square on the rank or file (assuming that it cannot be captured). The second diagram shows a slightly different position where the kings are not in opposition but the defending king must be in a corner. With the side with the rook to move, checkmate can be forced in at most sixteen moves from any starting position.[27] Again, see Wikibooks – Chess/The Endgame for a demonstration of how the king and rook versus king mate is achieved. In the third diagram position, White checkmates by confining the black king to a rectangle and shrinking the rectangle to force the king to the edge of the board:
Avoid stalemate There are two stalemate patterns:[30]
King and two bishopsThe two bishops checkmate is the checkmate of a lone king by the opponent's two bishops and king.[b] The superior side is able to drive the lone king into a corner and force mate using the two bishops and king collaboratively. The only stipulation is that the two bishops must move on opposite-colored squares.[c][32] Accomplishing the mate requires a maximum of 19 moves.
The king and bishops cooperate to drive the enemy king to an edge of the board, and then into a corner to deliver the mate.[31] "The process, though a bit lengthy, is fascinating because it gives us a glimpse of the power of the two bishops on the open board."[33] Three basic checkmate positions are possible via the two bishops checkmate.[34] The first is a checkmate in the corner. The second position is a checkmate on a side square next to the corner square (this position can theoretically occur anywhere along an edge, but can only be forced adjacent to a corner). With the side with the bishops to move, checkmate can be forced in at most nineteen moves,[35] except in some very rare positions (0.03% of the possible positions).[36] The third checkmate position is possible but not forceable.[34] It is not too difficult for two bishops to force checkmate, with the aid of their king. Two principles apply:
In the position from Seirawan, White wins by first forcing the black king to the side of the board, then to a corner, and then checkmates. It can be any side of the board and any corner. The process is:
This is not the shortest forced checkmate from this position. Müller and Lamprecht give a fifteen-move solution; however, it contains an inaccurate move by Black (according to endgame tablebases).[35] Avoid stalemate From Silman
1.Kb6 would be stalemate.
King, bishop and knightOf the basic checkmates, this is the most difficult one to force, because these two pieces cannot form a linear barrier to the enemy king from a distance. Also, the checkmate can be forced only in a corner that the bishop controls.[36][39]
Two basic checkmate positions are shown with a bishop and a knight, or the bishop and knight checkmate.[40] The first position is a checkmate by the bishop, with the black king in the corner. The bishop can be on other squares along the diagonal, the white king and knight have to be on squares that attack g8 and h7. The second position is a checkmate by the knight, with the black king on a side square next to the corner. The knight can be on other squares that check the black king. The white king must be on a square to protect the bishop and cover a square not covered by the knight. With the side with the bishop and knight to move, checkmate can be forced in at most thirty-three moves from any starting position,[41] except those in which the defending king is initially forking the bishop and knight and it is not possible to defend both. However, the mating process requires accurate play, since a few errors could result in a draw either by the fifty-move rule or stalemate. Opinions differ as to whether or not a player should learn this checkmate procedure. James Howell omits the checkmate with two bishops in his book because it rarely occurs but includes the bishop and knight checkmate. Howell says that he has had it three times (always on the defending side) and that it occurs more often than the checkmate with two bishops.[42] On the other hand, Jeremy Silman includes the checkmate with two bishops but not the bishop plus knight checkmate because he has had it only once and his friend John Watson has never had it.[43] Silman says: "... mastering it would take a significant chunk of time. Should the chess hopeful really spend many of his precious hours he's put aside for chess study learning an endgame he will achieve (at most) only once or twice in his lifetime?" Avoid stalemate
After 1.Na3+?, 1...Kc1! draws.
This position is an example of a stalemate, from the end of a 1966 endgame study by A. H. Branton. White has just moved 1.Na3+? If Black moves 1...Kc1!, then White must move his bishop to save it because if the bishop is captured, the position is a draw because of the insufficient material rule. But after any bishop move, the position is a stalemate.[44] Common checkmatesBack-rank mateFrom Burgess, p. 16
White wins with 1.Rd8#.
Scholar's mate
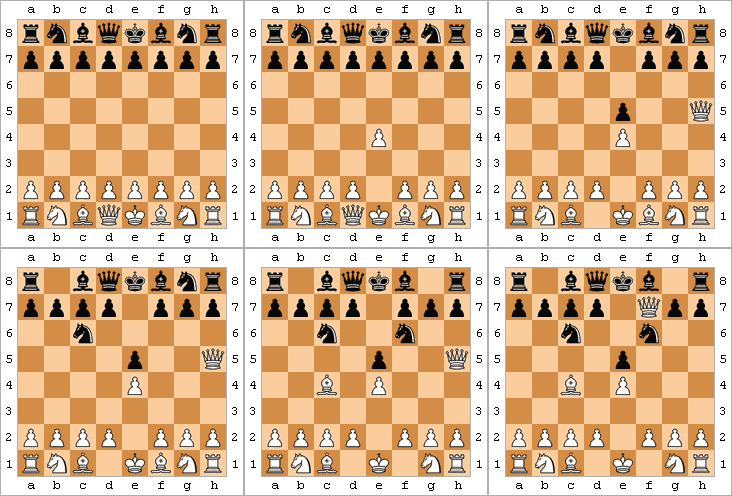
The scholar's mate (also known as the four-move checkmate) is the checkmate achieved by the moves: The moves might be played in a different order or in slight variation, but the basic idea is the same: the queen and bishop combine in a simple mating attack on f7 (or f2 if Black is performing the mate).[46] There are also other ways to checkmate in four moves. Fool's mate
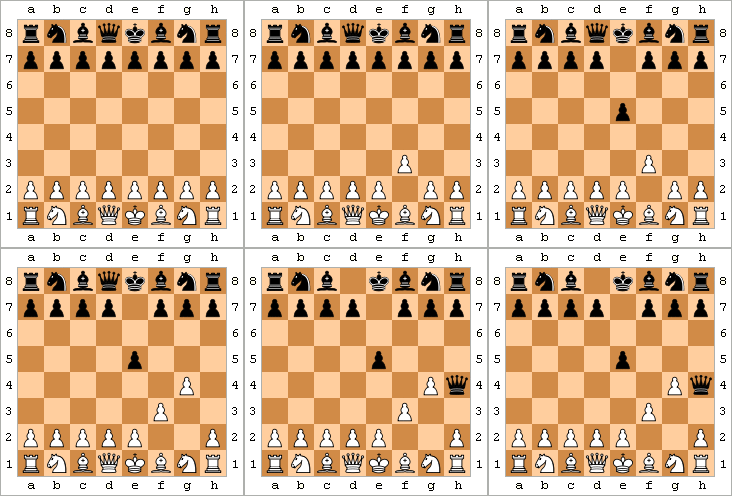
The fool's mate, also known as the two-move checkmate, is the quickest possible checkmate. A prime example consists of the moves: resulting in the position shown.[47] (The pattern can have slight variations, for example White might play f4 instead of f3 or move the g-pawn first, and Black might play ...e6 instead of ...e5.) Smothered mate
A smothered mate is a checkmate delivered by a knight in which the mated king is unable to move because it is surrounded (or smothered) by its own pieces.[49] The mate is usually seen in a corner of the board, since fewer pieces are needed to surround the king there. The most common form of smothered mate is seen in the adjacent diagram. The knight on f7 delivers mate to the king on h8 which is prevented from escaping the check by the rook on g8 and the pawns on g7 and h7. Similarly, White can be mated with the white king on h1 and the knight on f2. Analogous mates on a1 and a8 are rarer, because kingside castling is more common as it safely places the king closer to the corner compared to queenside castling. Rare checkmatesIn some rare positions it is possible to force checkmate with a king and knight versus a king and pawn. Stamma's mateStamma's mate
White wins with either side to move. In the diagram showing Stamma's mate (named for Philipp Stamma), White to move wins:[50]
White also wins if Black is to move first:
Nogueiras vs. Gongora, 2001
White to move wins. This checkmate occurred in Jesús Nogueiras–Maikel Gongora, 2001 Cuban Championship[51] (see diagram), which proceeded:
If 82...a2 then 83.Nb3#.
Reaching the position in the first diagram, with Black to move.
Black resigned here; play would have continued 84...a2 85.Nb3#.[52]
White to move wins. A similar position with the knight on d2 is more than 500 years old, identified as "Partito n. 23" by Luca Pacioli, in his MS De ludo scachorum (Latin for "The game of chess"), dated 1498 and recently reprinted (Gli scacchi) by Aboca Museum Edizioni.
Unusual matesThere are also positions in which a king and a knight can checkmate a king and a bishop, knight, or rook; or a king and a bishop can checkmate a king with a bishop on the other color of squares or with a knight, but the checkmate cannot be forced if there is no other material on the board (see the diagrams for some examples).[53] Nevertheless, it keeps these material combinations from being ruled a draw because of "insufficient mating material" or "impossibility of checkmate" under the FIDE rules of chess. The U.S. Chess Federation rules are different. In a typical position with a minor piece versus a minor piece, a player would be able to claim a draw if they have a limited amount of time left.[54]
Two and three knights
It is impossible to force checkmate with a king and two knights, although checkmate positions are possible (see the first diagram). In the second diagram, if Black plays 1...Ka8?? White can checkmate with 2.Nbc7#, but Black can play 1...Kc8 and escape the threat. The defender's task is easy – they simply have to avoid moving into a position in which they can be checkmated on the next move, and they always have another move available in such situations.[55] In the third diagram, one knight is guarding c1, leaving the other knight to try to checkmate. After 1.Ndc3+ Ka1, White needs to get the knight on e2 to c2. But if White plays 2.Nd4, Black is stalemated.[56] Under some circumstances, two knights and a king can force checkmate against a king and pawn (or rarely more pawns). The winning plan, quite difficult to execute in practice, is to blockade the enemy pawn(s) with one of the knights, maneuver the enemy king into a stalemated position, then bring the other knight over to checkmate.[56] (See Two knights endgame.)
Three knights and a king can force checkmate against a lone king within twenty moves (assuming that the lone king cannot quickly win a knight).[57] These situations are generally only seen in chess problems, since at least one of the knights must be a promoted piece, and there is rarely a reason to promote a pawn to a piece other than a queen (see Underpromotion). See alsoNotes
References
Bibliography
Look up checkmate in Wiktionary, the free dictionary. Wikibooks has a book on the topic of: Chess/The Endgame |
|||||||||||||||||||||||||||||||||||||||||||||||||||||||||||||||||||||||||||||||||||||||||||||||||||||||||||||||||||||||||||||||||||||||||||||||||||||||||||||||||||||||||||||||||||||||||||||||||||||||||||||||||||||||||||||||||||||||||||||||||||||||||||||||||||||||||||||||||||||||||||||||||||||||||||||||||||||||||||||||||||||||||||||||||||||||||||||||||||||||||||||||||||||||||||||||||||||||||||||||||||||||||||||||||||||||||||||||||||||||||||||||||||||||||||||||||||||||||||||||||||||||||||||||||||||||||||||||||||||||||||||||||||||||||||||||||||||||||||||||||||||||||||||||||||||||||||||||||||||||||||||||||||||||||||||||||||||||||||||||||||||||||||||||||||||||||||||||||||||||||||||||||||||||||||||||||||||||||||||||||||||||||||||||||||||||||||||||||||||||||||||||||||||||||||||||||||||||||||||||||||||||||||||||||||||||||||||||||||||||||||||||||||||||||||||||||||||||||||||||||||||||||||||||||||||||||||||||||||||||||||||||||||||||||||||||||||||||||||||||||||||||||||||||||||||||||||||||||||||||


